It Snapped! - Darn, Dang, Damn, %&!;
- thepadol2
- Jan 24, 2024
- 26 min read

One of the many fears a beginner cellist has, actually true of violinists, violists, and any other string instrument musician, is that of breaking a string when tuning it. Is it our fault? Maybe and while probable, only in certain cases is it completely our fault. Most of the time it's only a contributing factor.
I hardly think I'm an expert, but tune I must everyday, and it is something that requires a different set of knowledge and skills from learning to play the cello. In the short time since I've started, I think I now have a better understanding of what could lead to the dreaded snap and this makes it easier to mitigate as I learn from my mistakes. As a beginner, tuning the cello is always a must and is one of the first things we must do aside from positioning the cello correctly. It's uncharted territory and holds its own mysteries of the unknown. Some perhaps even choose to accept tuning their strings as best as they, not quite in perfect tune but "close enough". Sorry, but this isn't good enough because it affects how notes sound when played across different strings and it becomes an impediment to learning correct intonation.
While plenty abound on Youtube on how to tune, and those fortunate enough have teachers that show what must be done, I think a lot more can still be said to aid those just starting out. It is not an impossible task. Difficult? Only because it's unfamiliar. Once you figure it out, it's an experience on to itself.
This is more than just a musing, but I hope I can pique your interest enough so read all of it and discover that parts that haven't been covered elsewhere, and this is the dimension that can make a difference for you.
Disclaimer
This is not a perfect recipe. It is not a guarantee. I do not claim to be an expert. The material and information is not meant to be a cure nor a prescription. This is just a recollection of what has worked for me, how I have developed the sensitivity, and my curiosity of the peculiarities of installing and tuning strings on my cello.
Where to start then? There are several pieces to the puzzle. Some you can understand quickly, others may take more time. From my learning perspective (that which I wish I had known earlier when I started), I hope that I'm able to create that little bit of magic by making the touch and feel you need to have comprehensible through the language of words that we have.
Tuning can mean many different things. At some point you learn to tune only the A to a reference and then tune the other strings relative to it without any external aids. This involves another set of skills and technique. Here I'm only trying to get one string setup and in tune to a reference, and without snapping it in the process. When you can do this comfortably then the other techniques will just be the icing.
To explain, there are three aspects and approaches to appreciate:
The why or things you need to prepare before hand - akin to knowing the lay of the land, maybe some theory but certainly applicable aspects to keep in mind to tune successfully and mitigate broken strings in the process.
The steps - setting up the string to apply tension and get it to pitch. The mechanical steps.
The steps again but what you need to see and feel - the heart of how you feel comfortable with tuning, the most difficult aspect to translate and explain with words, even pictures or videos are limited in this.
The Why - Beforehand
About Strings
A cello string is not a simple product, but that's not particularly important to how you must tune. Just think of the string as made of a material that stretches under tension. Common sense tells you that you cannot stretch infinitely, there is a breaking point. This is in the ideal condition. In real conditions of your cello, this breaking point might be considerably less than what it was designed for, but a breaking point nonetheless. If you think about it, if the manufacturer of the string allowed it to break easily at just the point you were to reach the right pitch, then they wouldn't be in the business for long. Indeed the string, once in pitch needs to remain under that tension for many months and playing time. I'm not saying forever, but for some amount time that you would consider to be an commensurate for the economic investment vs results.

Without going into the details of physics and metallurgy, and for the sake of discussion, a string is relatively delicate and so while it will stretch as tension is applied, this change cannot occur quickly or abruptly, otherwise failure can occur. This is a fundamental characteristic which we must always remind ourselves of.
As with many other objects, a string can be degraded in many ways making a snap possible. The most common is something we can call a pinch point. Think of it like cutting into the string. That introduces a failure point with respect to the rest of the string. The same is true as the string composition isn't 100% the same throughout its length, some point will be weaker than others.
This all introduces the notion that there are many dynamics that a string experiences as we tune.
So, we have a broken A string and we have new one in its package. As we take the new one out we notice how it is curved or wrapped around itself - no bends, just a constant smooth curve. As we untwirl it, it naturally straightens itself. Let it be. Never try to fold it because that is a breaking action.

If the old broken string has been removed, now comes the preparation work. The key parts to work on are:
fine tuners
the bridge (and the sound post)
the nut
the peg
the pegbox

The Fine Tuners
There are different types of fine tuners but all provide the same function - the ability to tension a string over a very limited range, +/- a semitone to a tone. Most of the time they have a curled holder into which a the ball end of the string slots into. We call it the the ball end of the string but it's more of thick cylinder. As a cylinder rather than a ball, this means there is vertical vs horizontal direction.

The Ball End

You want to place it so that cylinder lines up with the curl and the string goes through the slot without catching on to something or possibly rubbing. The fine tuner should merely grab onto the cylinder/ball as one end of the string to be tensioned. Before you start though, the fine tuner should be adjusted so that it's range is usable once a string is under tension. Rotating the fine tuner clockwise increases tension and so pitch increases. Likewise counterclockwise decreases pitch. If the fine tuner is all the way clockwise it will never be able to increase pitch further, only to decrease it. In theory you would rotate the adjusting screw so that it is somewhere in between the two extremes. That would be fine if you actually did the initial peg tuning and got the string to be be on pitch. In practice it is safer to tune with the peg to within a semitone lower than pitch and do the rest with the fine tuner. Once you are more experience you could tune exactly with the peg, but that's perhaps taking additional risk unnecessarily. So maybe you would set the fine tuner adjuster so that it can go up 2/3 and down1/3. You'll know later if this works for your specific cello.
Unless you hold on to the string as you move towards the other end, the ball end is simply going to disengage. This is where you begin to think you can't do two things at the same time. You're right at this stage but only because you've never done it before so the sequence and movement are alien. So, if it disengages, don't worry, you will be plenty occupied at the other end.
The Pegbox

The other end is the pegbox end. The cello was created in a time when gears weren't common place and if there were gears made of wood they would have been large in scale compared to a cello. So the peg is something that leverages the friction between two types of wood, one harder than the other. The peg has a tapered shaped so that it moves freely when pulled out and holds firmly when pushed in. The challenge is that the fine line between free and firm changes as the string tension is increased. At the same time, as string tension increases, less and less change (turn) is required to increase tension.
Pegs and Taper
The taper is a standardized measure and there is a corresponding reamer to be used on the pegbox by a luthier. What this means is that the peg and the hole it fits in is a precise match. As precise it might be, that's only true at specific points and combination because wood is organic, it will change over time and react to ambient conditions. But that's the beauty of a taper, by pushing the peg in, at some point the taper of the peg is larger than the hole it is and therefore friction occurs. If enough it literally "grabs" and will counteract the force the tension imparts.

Now, you may be told that there is a peg paste that you can apply that is magic - it makes it easier to turn and it will help to hold in place when you push it in. Perhaps, but it's still the physics of the shape that enables a peg to be held in the pegbox. Pushing a peg in while you are turning it does require practice but it is not a difficult dexterity.
Let's pause for a moment because this is the most crucial and difficult knowledge to impart - how to increase the tension delicately as you approach pitch. You could practice with a peg and no string just to get a better feel of what is to be learned. A peg has a grip so you can actually turn it. Normally you grab the grip with your entire hand and not just the tips of your fingers when you must impart minute movements. When they tell you small limited movements or a fraction, that doesn't explain what you are to feel so you would be tempted to visualize it as being something you could see with your eyes. Quite the opposite actually. The movement you want on the peg is almost imperceptible to the naked eye, it is literally by feel. One way of describing this feel - you have the peg grip in your hand. Now you tighten your hand hold as you prepare to make a movement, but what movement? You would think the movement of a hand twist in the clockwise direction. The direction is correction. What you want is the start of the action as the hand hold tightens firmly and you impart the minimum amount force for the peg to advance ever so slightly. The hand actually hasn't even yet twisted, just the fingers as they tighten and set up for twist. You can feel the peg release and shift just a little. Perhaps you can think of the feel you develop when modeling clay. If you took a lump of clay with a relatively hard consistency, place it on the top of a table, and then pressed with the palm of your hand - how much you could flatten it is done by the force in your palm without the hand moving. It just depends how much your hand and palm muscles contract. The same with the peg. It's a nudging movement rather than an actual twist. However, if you just did this the peg would immediately slip back once you release your grip and the string tension takes over. This is why when you perform that initial turning setup action and you can feel the peg release, you must also impart the pushing action - pushing the peg back in so that the wood friction catches properly. This all happens in the span of time that you could say "ugh" to your self. You can feel a muted sort of click as if the peg moved to the next imaginary notch. You can tell by feel if the peg took hold.


Now you check if the pitch has changed, hopefully it is as you expected. But let's not get too ahead of ourselves. We still have to put the string on properly before anything else. After the ball end you want to thread the other end of the string into the peg. Easy to say and equally easy to do, but you have to appreciate the steps that follow so that indeed the initial threading goes smoothly.
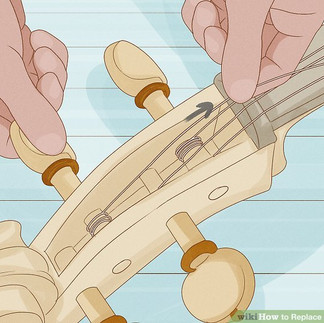
To provide tension the pegs will always be rotated in the clockwise direction and this means the string goes over the top of the peg and not under. There is no choice in this. It is by design. This is true specifically for the cello.
The Overlap
Clearly the string is longer than the length that will be under tension. This excess portion is the part that will be wound around the peg. You thread the loose end into the hole in the peg until exits the other end. Let about half an inch come through. Now comes a tricky part and it must be done to avoid problems later. If you were to merely wound a string around the peg, it could possibly pull itself loose with the amount of tension applied. In others it merely slips around the peg until it is completely unraveled. No good. So there has to be a way to "lock" the string onto the peg. It's not like the ball end. The solution is quite simple.

All it takes is for the string to cross itself once and that friction force will be more than sufficient. That's easy to understand and picture. However, the cello requires a specific way for the cross and overlap to be made. Once threaded, on the first rotation to create the overlap, this must occur on the external side of how the string will be wound. Looking at the peg from the front, you will want the string to wind on the side of the peg and the hole that is away from the side of the pegbox. Once you create the overlap and you continue to wind, the string must now wind towards the side of the pegbox, creating a neat winding, the string must never overlap again and there a snug fit as the string winds. You turn the peg, winding the string until it come under tension, from the fine tuner to the peg, with the string sitting in the groove in the bridge and the groove in the nut.

The Bridge and The Nut

Once you remove the broken string, you now have the opportunity to inspect the groove in the bridge and the nut. Both should have a smooth appearance. The string will rest and pass in the grooves. So these are two critical spots which can introduce early failure or make your tuning a chore. Candidates for a pinch point. Try to imagine this - that tautness and tension of a string is from one end to the other - from the ball end to wound end on the peg. So as a string is stretched, it must sustain this expansion and stress along the entire length in a balanced and consistent way. On the other hand the string must vibrate at a specific length to sound properly and this is created between the bridge and nut. This distance between the bridge and nut is fixed, but the tension is not. If you think about then, this means that as you increase tension to achieve the desired pitch, the string needs to stretch without any impediments. Therefore the string must be able to slide in the grooves of the bridge and nut. If a string is not free to slide grooves, then as you increase tension, some parts of the string will experience a much higher level of stress while producing little pitch change.

For example, if it is locked on the bridge, and you turn the peg, some amount will stretch between the bridge point and the peg, but considerably less that the amount the string will stretch between the bridge point and the ball end. In fact the bridge acts as a transfer point of the tension applied. If you continue with this, the bridge will actually bend to accommodate the forces that are occurring.

Both nut and bridge grooves must be lubricated to make it possible for the string to slide rather than catch. The easiest way is with graphite as found in the lead of pencils. So just take a pencil and use it to supply some amount of graphite. That's all it takes. There are other ways and solution, but the pencil is the easiest and simplest to find.
The Steps - the Mechanics or 20,000 ft View
a tuning reference
for ease you could place the cello horizontally on a table, a bed, or a couch. Make sure the surface is soft and will not damage the back. It should be at height so that you are comfortable leaning over it.
remove the old string, leave all the others in place
inspect the fine tuner, adjust the tuner so that it will have the best usual range
inspect the grooves in the bridge and nut, lubricate with pencil graphite. Don't overdo it but better more than none at all
take the peg out and give it a quick wipe. Place it back in the pegbox.
fit the ball end to the fine tuner
with one hand fit the string in the groove in bridge. Just hold the string between your figures to keep it straight, not taut or tight.
now you need to keep it straight while you move to the pegbox to work on the other end.
thread the end into the peg and start the wind making sure you have the crossover to lock the string in
wind until the string stays in place on the bridge and nut
inspect that it is seated correctly and the ball end is engaged correctly with the tuner
wind until there is enough tension for the string to reach an octave under pitch
now switch to the upright position so that you can slowly very slowly turn or nudge the peg so that the string reaches a semitone under
switch to the seated position and continue with your bow and tuner. do all the adjustment with the fine tuner
The Steps - Dissected and A Closer View
a tuning reference It can be anything from a free mobile phone app to a specialized electronic tuner with a pickup. Any and all work for the purpose. Just make sure that it can tell you the current pitch it can hear. This is the aid as you work towards getting the string to pitch.

for ease you could place the cello horizontally on a table, a bed, or a couch. Make sure the surface is soft and will not damage the back. It should be at height so that you are comfortable leaning over it. You will need to work with both hands so the cello needs to be supported somehow and in an accessible way to let you do what you need to do. Even the floor will suffice if you have a rug or a rubber pad to protect the cello. Imagine crashing your body onto the cello - unthinkable catastrophe. If you have eyesight problems for anything up close, factor that in too. Don't be afraid to experiment within reason to find the best positioning for you.
remove the old string, leave all the others in place Not particularly difficult. Once the string is without tension, unwind it enough so that you can remove the ball end from the fine tuner. This makes it easier to complete the unwinding to remove at the peg end. Try not to disturb the remaining strings. Even a slight bump to their pegs could cause them to be loosened.
inspect the fine tuner, adjust the tuner so that it will have the best usual range To learn more about your specific fine tuner, you could visually see its possible range. With just the fine tuner (no string ball end in the fine tuner), rotate the adjuster clockwise. As you do this the the knob will move towards or into the fine tuner plate. You will also see how the fine tuner clasp or claw for the ball end of the string rotate in a direction away from the bridge. At some point you will reach the end point of the knob in the clockwise direction. This represents end point that the fine tuner is capable of reaching when increasing pitch. Now rotate the knob in the counterclockwise direction, basically loosening it. As it rotates note how the height of the screw increases as it rises from the fine tuner plate. Likewise the clasp or claw will now move in the opposite direction, towards the bridge. At some point the knob will stop turning. If not it may simply become unscrewed from the claw. Either way this represent that maximum or nearly amount it can go in the opposite direction. It is equivalent to the maximum decrease in pitch possible. If you visualize this total height, then half the height is basically the midpoint of the adjuster. If this midpoint is also the A string sounding as A in pitch, then the adjuster would have at least a range of a semitone up or a semitone down. But if with peg tuning you got the A string to within a semitone down, and this was set to the midpoint of the adjuster, then the maximum you could do adjusting up is to get it to A in pitch and no more. Kind of defeats one purpose of the fine tuner. This is why you want the adjuster initially set to a third (from max height) and this way you have the ability to adjust up a semitone and some more.

inspect the grooves in the bridge and nut, lubricate with pencil graphite. Don't overdo it but better more than none at all You could take a magnifying glass to look, but that's overdoing. With the naked eye you can quickly tell if something looks odd - a piece of dirt, splinters, etc. Some people can get into a lengthy discussion on different pencil leads, their composition, what's better, and so on. Again, for this purpose, any pencil lead, typically HB or HB2 found in most households works just fine. Depending on how your cello was sourced, the bridge may have its groove lined (like a paper insert) so graphite wouldn't be needed. On the other hand the groove for A string might have been poorly shaped, and cause it to catch more easily. The graphite should help mitigate in this scenario as you simply don't have the knowledge to evaluate the bridge. Just know that the groove isn't merely V shaped.

take the peg out and give it a quick wipe. Place it back in the pegbox. Try using something that won't leave lint. Soft cotton cloth or a thick paper towel. No need to rub, just a simple wipe. It's a precision fit so you don't want to overdo it. Now is a good time if you want to experiment with how the fit feels. As you put the peg back in, do some smooth clockwise and counterclockwise rocking to feel how it slips. At some point it becomes snug. Now see how it feels to nudge it clockwise and at the same time push it in to make it grab and stick. Should be fairly easy as there is no string tension pulling on it. See how it feels to loosen and then how to make it snug again. This is how the taper works. If this were an industrial machine, one would probably use a wrench to rotate the peg and while the wrench holds the position, a hammer would be used to hammer the peg in place, a true force fit. Sounds rather crude. But that's exactly what we need to do leveraging human hand dexterity.
fit the ball end to the fine tuner If you looked when you were removing the snapped string, then you would see exactly how the ball end goes in the clasp or claw. Pretty simple. Unfortunately it can happen the clasp or claw at its pointed end could catch on the ball end at a strange angle, but your hand holding the string would only feel tension making you think the ball end is being held properly. Only a visual inspection can confirm.
with one hand fit the string in the groove in bridge. Just hold the string between your figures to keep it straight, not taut or tight. It's similar to the challenge we face when trying to loop a ribbon around a gift box and then tie it up into a bow. How to keep the ribbon taut while working it around? one or two hands? Which hand and which fingers does what is something you quickly get just by our human magic in dexterity. It's all by feel and feedback. Our hand and fingers have an incredible range.
now you need to keep it straight while you move to the pegbox to work on the other end. Follows from the previous step.
thread the end into the peg and start the wind making sure you have the crossover to lock the string in The ball end might come loose from the fine tuner. Let it be, don't worry. Threading into the peg isn't automatic or easy. A new string doesn't yet have the wind so it has a tendency to stay straight. Once you understand how the ball end works, you might actually start at the peg end because to do the overlap and initial winding does require a hand to keep the string taut enough so that it doesn't unravel. Once you have enough wound, you could use one hand to keep the string lifted to keep it taut and the other hand to engage the ball end.

wind until the string stays in place on the bridge and nut Now as you continue to wind the peg, the string will shorten until it is short enough to fit in the grooves of the bridge and nut, and your hand get let go as it is now in tension over the two points.
inspect that it is seated correctly and the ball end is engaged correctly with the fine tuner It may seem superfluous given how much attention we've dedicated so far in placing the string, but trust me, once the string stays on its own, take a step back, catch your breath, and then look methodically, from one end to the other. Make sure there's enough light so that you can see from different angles. The ball end could have slipped or shifted position. The grooves are pretty straightforward, either the string is in or it's out. Look at the inside of the pegbox, the string could be wound right up to the side and it may already be rubbing. You'll have to correct otherwise you won't have room to continue.
wind until there is enough tension for the string to reach an octave under pitch This is done by rotating and pushing in the peg, but it doesn't require much force and fractional movements are pretty easy to achieve as the tension isn't significant yet. It doesn't have to be exactly an octave under pitch but it's generally when the tension is evident and you can clearly feel the opposing force as you try to rotate the peg. Now is the time to move to the next phase.
now switch to the upright position so that you can slowly very slowly turn or nudge the peg so that the string reaches a semitone under This is it. This is the crux of the process. Everything you have done so far is to make this step smoother and with less risk to end up with a broken string. The only factor that remains is how well you can perform this step with confidence.

Holding the cello for this phase
We are all anatomically different and it is certainly part of the challenges when playing as our hands come in all sizes and shapes. We learn to adapt. I remember thinking to myself - how do I hold the cello to tune with the pegs? The fine tuners are easy since you adjust them with the cello in its normal position. In my case I'm 5'6", rather stout, stubby fingers, and short legs. I'm also somewhat clumsy. I'm right handed. To do the initial setup and tuning with the pegs, I find it best to use a standing position as it gives me good leverage. I hold the cello facing me, the endpin is extended but so that the pegbox and pegs are at a comfortable level to reach for my hands. Facing me then, I use my right hand on the pegs for the D and A string. I find it comfortable to grasp the peg grips in my hand solidly and then be able to apply pressure for a rotational nudge that I can feel. I can sense the peg move and then grab again. It sounds like "tuc tuc" if I do like a double movement. If I don't hear and sense the "tuc" even if the peg has moved slightly, I am almost certain that if I release my grip the peg will simply unwind backwards. Perhaps a little, perhaps much more, but it doesn't matter, it just didn't grab. For the G and C string I rotate the cello so that the front is facing away and I can comfortable grip the G and C pegs with my right hand. As I raise the tension in this position, I merely pluck on the string to measure the pitch with the tuner. No bow is involved. Once I get the string to within a semitone I adjust the endpin if needed and change to a seated position so that I can now hear the string with the bow. I will raise it to pitch using the fine tuner. It is unlikely that the fine tuner will cause the string to slip and unwind. Getting to the point where I can use the fine tuner means I'm on the last stretch.
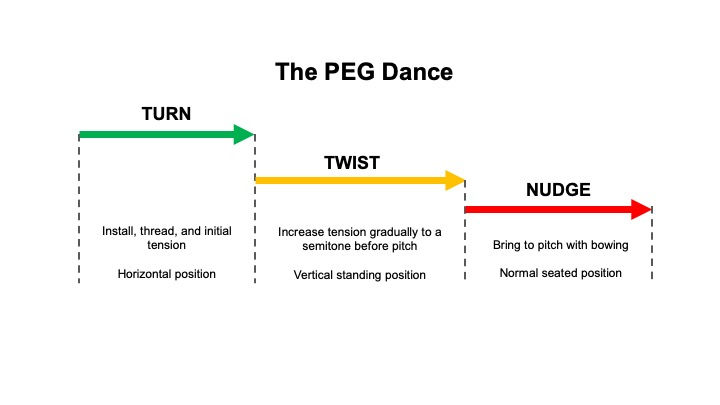
The Turn, Twist, Nudge
Terms mean different things to different people when there's no absolute reference. If someone were to say it's pretty short, what does that really mean? It needs a reference. If they were to say a couple of inches we have a better chance of being in the right ballpark. When we are told to turn the peg just a fraction, we might say OK when we hear it, but then when we actually sit down and have our hands on the peg, we are now unsure what a fraction means. One full rotation is something we understand. Half a rotation as well, and since they said a fraction rather than half we know it has to be less. We can also probably envision what a quarter of a rotation is because it's possible to visualize. But again, they didn't say a quarter so it has to be less. If we considered it from a geometrical perspective, a quarter rotation in our mind becomes 90 degrees but still this isn't of great help. Without any other input, most of us would probably begin to think that a fraction is less than a quarter turn, so to be on the safe side how about we do half of a quarter turn? That's a pretty small and limited turn when compared to other things we do in life. Stop. A peg is quite small. The rotational angle is visually quite a very limited move. If we tried to rotate it 45 degrees visually as our objective it may be quite more than what is needed. We need to do this fractional rotation only by feel, and only as the result of a nudge or budge, making sure the peg grabs every time to hold the new position. Think of what we do when we twist the lid of sealed jar of jam. We need to overcome the forces that hold it in place, but just about. We can sense the moment it has been overcome and the lid. begins to move. If we release our hold quickly enough the lid will still remain in place and will not turn loose. Overcoming and feeling that similar threshold point is the sensitivity we need to practice and become familiar with.
Doing all this calls for patience, plenty of it. Moving the pegs delicately means slower than a snail's pace. If you're in a rush you've simply made the task impossible. If nothing breaks maybe it's beginner's luck but it will come back and bite you in the future. Sure you see and hear professional cellists all the time that twist and turn their pegs smoothly and you can hear them tune quickly up and down, almost like a seesaw. They can because they can sense that string is not catching where it shouldn't and their movements are actually very smooth, not jerking, a soft start and knowing if the peg is grabbing properly. Maybe they were like those who were thrown in the water as babies and just learned to stay afloat naturally. There has to be a more sensible approach. We learn to crawl before we walk, and only after we have mastered walking, can we run gracefully. As you bring the A string into initial tension it will probably be an octave lower that it should be. Now as you start to rotate the peg carefully you will see that it will release quite easily and that it will hold as you press in, the tension in play is not that much. Move incrementally checking to see how it moves up by semitone and full tone. I always suggest steps of semitone and pause. This way you give the chance to the string to support the stretch properly. Once you get to 3 tones from the pitch, say an E, then you should begin notice the increased difficulty to apply the right rotational force in the hand to just move it perceptibly. It might begin to baulk at holding the position and release completely. Start again and be prepared to provide a higher level of pushing in for the peg to hold. Once you get to the F see if you are able to get to F# with the same amount of slight rotation. If you yes, then most likely the string is sliding on the bridge and nut properly. If you begin to notice that you can increment rotation but there is very little pitch change, then I would say this is a warning bell. You could continue but with all we have said so far, most likely the string is experiencing a number stresses that do not bode well in the long run. Stop and loosen the string. Look at the nut and particularly the bridge to see if the string can slide freely. If not a touch of graphite could do the trick. Re-tension and see how it goes.
If you are able to get to a G# and the peg holds, bravo. Now to the final step.
switch to the seated position and continue with your bow and tuner. do all the adjustment with the fine tuner If you've made it this and the peg holds, congratulations! You are now in the home stretch. Seated normally you now bow on the open string that you changed. Use the fine tune adjuster to bring it to pitch. Over the next days the string will settle in. You might have to adjust in down or up in pitch and eventually it will stay almost on pitch over different days unless there are significant humidity changes in the environment. Sometimes the peg might not hold and releases tension completely. Can happen overnight. Can happen as you play. Then it's time to restart the tuning as if you had just replaced the string, but now you know what to do. Welcome to the find world of cello string tuning.
Tuning a string can be relatively straightforward or it can frustrating when several things seem to occur together. Tuning one string and only that string rarely happens because how you bring a string to pitch under tension has a dynamic effect on the others. Think of it like a delicate balancing act. And if you touch any of the other strings, anyone of them can be the source of more tuning challenges - a peg loses its friction and the string unravels. But once you learn and understand the technique it's just a matter of applying them to each of the string.
A few words on context and why your mileage may vary. Whatever cello you have, new, old, reconditioned, serviced by a luthier, and any other in between, as a beginner a string is a string and just a string. As you now appreciate, knowing the condition of the other elements that a string comes into contact with, is what tells you with what ease you will be able to tune it. A brand new instrument or one that has just been serviced by a luthier, will normally have new strings, and new strings means that you can be less concerned about age degradation. In all other cases you might have to guess a string's age depending on other info. I'm told that a professional musician, one who practices everyday, will likely change strings within a year's time. As a beginner your hours will be much less and strain you impart with playing technique will limited as well. Analogous to car tires, you yearly mileage might be low and therefore your threads will remain much longer, but rubber ages regardless and beyond the useful lifetime they become hard as wood making the car tires really insecure. With strings this aging will not only affect the sound quality but will create problems if you need to constantly tune more than just a semitone.
There can also be other problems, but they are probably relatively uncommon or infrequent, and hopefully only very few of us will ever the unfortunate circumstance of encountering them.
Last but not least. If practice is the adage, then why not practice replacing strings and build the feel that is required with a string that you won't mind breaking or throwing away? Why would we "learn on the job" with our best string and if it breaks it also hurts our pocket? Is it the fear that if we remove a string it will never go back on as before? I can understand this fear, but practice brings familiarity and confidence. Unfortunately it is not possible to pickup a throwaway cello for 50$ to practice string tuning since this object, I wouldn't call it an instrument, is probably poorly built with so many inherent problems, that we would never learn tuning properly.
There is a rule you never want to forget and it is also something you keep in mind as you're tuning. Neither the bridge nor the sound post are elements that are fixed to the cello by glue. They are in their respective place by virtue of being held there. For the bridge it is the tension of the string compressing it on the feet that connect to the soundboard or the top face of the cello. The sound post is inside the cello and basically underneath a foot of the bridge. It is.a force fit between the two plates - top and bottom - with the additional force transmitted thru the bridge from the strings. The proper placement of the bridge and sound post is what makes the cello produce its sound, how the magic happens. If there is no force acting on the bridge, it will shift and eventually topple over. Maybe not a complete disaster as you might be able to make out by the marks left on the top cover as to where it should sit. But with no downward force, and because wood can easily expand, there's no certainty that the sound post has not shifted or even worse that it fallen over. A complete disaster because only a luthier has the tools and knowledge to re-position it correctly.
Therefore, never never loosen all the strings at the same time if you wanted to change all your strings. Work on one string at a time while ensuring the the other keep the bridge upright and in position. There are moments when a string suddenly unwinds as you are tuning and as you try to sort it out, other one becomes loose. Panic sets in. Stay calm and just quickly wind one of the loosen string so that it is at least firm on the bridge and you know the peg will hold because the tension is well below pitch. Now if other pegs loosen at least one string will save the day.
The Journey
This has been a rather lengthy description of my experience so far. At least if I snap a string, I will curse but I know how to move on. I no longer panic. I understand what I have to do. Tuning with a reference works well but I expect to eventually be able to do tuning of strings by harmonics and fifths, and so on. I have yet to play in an ensemble or orchestra, and how the musicians are able to check or tune their instruments in those few seconds before the start seems to be another mystery to unravel.
Perhaps another musing some time in the future.


Well, that felt like a master class in cello strings. I don't know if these are all correct, but some thoughts:
1 - The peg fitting sounds a lot like a morse taper in machine tooling. Just the perfection of the matching of the taper is all that holds a drill chuck in place.
2 - Strings are fighting the line between malleable and brittle. They need to stretch when you want them to stretch to tune and then be rigid so they don't go out of tune.
3 - The pinch points are very important because the string will be vibrating at high frequency. If they aren't perfectly smooth, it would be like a saw blade on the string.